Creating a DIY ribbon rose bouquet is an elegant and cost-effective way to add a personal touch to any special occasion. Whether you're planning a wedding, anniversary, or simply want to brighten up your home, crafting your own ribbon rose bouquet can be both fun and fulfilling. This guide will walk you through the process step by step, ensuring your bouquet turns out beautifully.
Floral arrangements have always been a popular choice for decorating events and spaces. However, traditional flower bouquets can be expensive and short-lived. Ribbon roses, on the other hand, offer a durable and customizable alternative that can last indefinitely. They are perfect for those who want to create something unique and timeless.
This article will provide you with a comprehensive step-by-step guide to crafting your very own DIY ribbon rose bouquet. By following the instructions carefully, you’ll be able to produce a stunning arrangement that will impress family, friends, and guests alike. Let’s dive right in!
Read also:Exploring The Literary World Of N D Wilson A Journey Through Imagination And Faith
Table of Contents:
- Introduction to Ribbon Roses
- Tools and Materials Needed
- Making Ribbon Roses
- Assembling the Bouquet
- Customizing Your Bouquet
- Tips for a Perfect Bouquet
- Common Mistakes to Avoid
- How to Care for Your Bouquet
- Inspiration and Ideas
- Conclusion
Introduction to Ribbon Roses
Ribbon roses have become increasingly popular in recent years due to their versatility and charm. These roses are crafted from various types of ribbons, such as satin, chiffon, or organza, each offering a distinct look and feel. The process of creating ribbon roses involves folding, cutting, and shaping the ribbon into petals that mimic the appearance of real roses.
Why Choose Ribbon Roses?
There are several reasons why ribbon roses are a great choice for bouquets:
- Durability: Unlike fresh flowers, ribbon roses do not wilt or fade over time.
- Customization: You can choose from a wide range of colors, textures, and sizes to suit your personal style.
- Cost-Effective: Creating a ribbon rose bouquet is generally more affordable than purchasing fresh flowers.
Tools and Materials Needed
Before you begin crafting your DIY ribbon rose bouquet, it's important to gather all the necessary tools and materials. Having everything ready will make the process smoother and more efficient.
Materials:
- Ribbon (satin, chiffon, or organza)
- Wire (floral wire or craft wire)
- Hot glue gun and glue sticks
- Scissors
- Floral tape
- Green ribbon for stems
These materials can be found at most craft stores or online retailers. Ensure you purchase high-quality ribbons and wires for the best results.
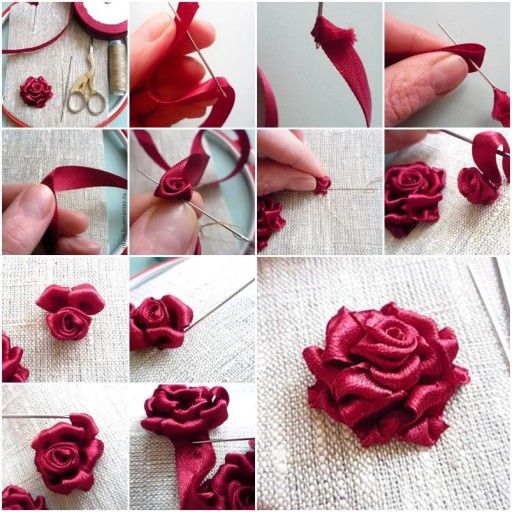
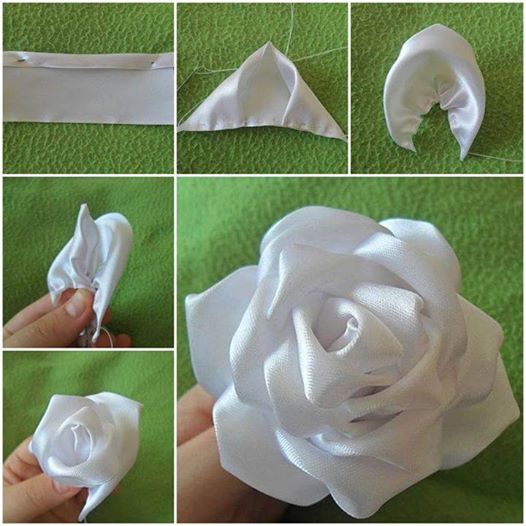
Making Ribbon Roses
Creating ribbon roses requires patience and attention to detail. Follow these steps carefully to craft beautiful roses for your bouquet.
Read also:Discovering The Elven Archer The Journey Of Legolas In Lord Of The Rings Actor
Step 1: Prepare the Ribbon
Cut the ribbon into strips of varying lengths, depending on the size of the roses you want to create. For a standard rose, a strip of about 12 inches should suffice.
Step 2: Form the Center of the Rose
Take one end of the ribbon and fold it diagonally to create a triangular shape. Secure the folded corner with a small piece of wire twisted tightly around it.
Step 3: Create the Petals
Continue folding the ribbon in a zigzag pattern, securing each fold with wire. As you work your way down the ribbon, the petals will naturally begin to form.
Step 4: Shape the Rose
Once you've used up the entire ribbon strip, shape the rose by gently pulling the petals outward. This will give your rose a more natural appearance.
Assembling the Bouquet
Once you have created enough ribbon roses, it's time to assemble them into a beautiful bouquet.
Step 1: Arrange the Roses
Begin by arranging the roses in your desired pattern. You can place them side by side or stagger them for a more dynamic look.
Step 2: Attach the Stems
Use floral tape to wrap the stems of the roses together. This will provide stability and ensure the bouquet holds its shape.
Step 3: Add Green Ribbon
Wrap green ribbon around the stems to conceal the floral tape and add a finishing touch to your bouquet.
Customizing Your Bouquet
One of the best things about DIY ribbon rose bouquets is the ability to customize them to suit your preferences. Consider the following options:
- Color Variations: Mix and match different colors to create a vibrant bouquet.
- Texture: Experiment with different types of ribbons to add texture and depth.
- Size: Vary the size of the roses to create a more dynamic arrangement.
Tips for a Perfect Bouquet
Here are some additional tips to help you create a stunning DIY ribbon rose bouquet:
- Practice makes perfect. Don't be discouraged if your first few roses don't turn out exactly as you envisioned.
- Pay attention to detail. The more care you put into shaping each rose, the better your bouquet will look.
- Experiment with different arrangements. Try various layouts to find the one that best suits your style.
Common Mistakes to Avoid
While crafting your ribbon rose bouquet, be mindful of these common mistakes:
- Using Low-Quality Materials: Poor-quality ribbons and wires can result in a subpar bouquet.
- Rushing the Process: Take your time to ensure each rose is crafted with precision.
- Ignoring Safety Precautions: Always handle hot glue guns and sharp scissors with care to avoid injury.
How to Care for Your Bouquet
Proper care will ensure your DIY ribbon rose bouquet remains beautiful for years to come. Here are some care tips:
- Store the bouquet in a cool, dry place to prevent damage from moisture.
- Avoid exposing the bouquet to direct sunlight, as this can cause the colors to fade.
- Dust the bouquet gently with a soft cloth to keep it looking pristine.
Inspiration and Ideas
For further inspiration, consider these ideas for your DIY ribbon rose bouquet:
- Create themed bouquets for different seasons or holidays.
- Incorporate additional embellishments, such as beads or pearls, for extra flair.
- Experiment with unconventional colors, such as metallic or neon ribbons, for a modern twist.
Conclusion
Creating a DIY ribbon rose bouquet is a rewarding and enjoyable project that can yield stunning results. By following this step-by-step guide, you'll be able to craft a beautiful bouquet that will impress and delight. Remember to take your time, pay attention to detail, and have fun with the process.
We encourage you to share your creations with others and leave a comment below to let us know how your bouquet turned out. For more crafting ideas and tutorials, explore our other articles on the site. Happy crafting!