Remote access for Raspberry Pi has become an essential skill for tech enthusiasts, developers, and hobbyists alike. Whether you're managing a home automation system, running a server, or simply experimenting with IoT projects, being able to access your Raspberry Pi remotely opens up a world of possibilities. This guide will walk you through everything you need to know about setting up and optimizing remote access for your Raspberry Pi, ensuring you can manage your device from anywhere in the world.
With the growing popularity of Raspberry Pi devices, understanding how to establish secure and efficient remote connections is crucial. Imagine controlling your smart home devices, managing files, or even running complex applications on your Raspberry Pi without being physically present. This capability not only enhances convenience but also significantly increases the versatility of your projects.
In this comprehensive guide, we'll explore various methods of remote access, discuss security considerations, and provide step-by-step instructions for setting up different remote access solutions. Whether you're a beginner just starting with Raspberry Pi or an experienced user looking to optimize your remote access setup, this article will equip you with the knowledge and tools you need to succeed.
Read also:Sophie Rain Erome Rising Star In The Fashion Industry
Table of Contents
- Introduction to Remote Access
- Essential Remote Access Methods
- Setting Up SSH for Secure Access
- Using VNC for Graphical Access
- Web-Based Remote Access Solutions
- Advanced Remote Access Techniques
- Security Best Practices
- Troubleshooting Common Issues
- Use Case Scenarios
- Conclusion and Next Steps
Introduction to Remote Access
Remote access for Raspberry Pi refers to the ability to control and manage your device from a different location, using various network protocols and tools. This capability is particularly valuable for users who need to maintain their projects without physical access to the device. The concept of remote access has evolved significantly, from simple command-line interfaces to sophisticated graphical environments that mimic local desktop experiences.
Several protocols and technologies enable remote access, including SSH (Secure Shell), VNC (Virtual Network Computing), RDP (Remote Desktop Protocol), and web-based interfaces. Each method has its own advantages and use cases. For instance, SSH is perfect for command-line operations and scripting, while VNC provides a full graphical interface. Understanding these options allows you to choose the best solution for your specific needs.
Before diving into specific methods, it's important to consider some fundamental requirements. Your Raspberry Pi must be connected to the internet, either through a wired connection or Wi-Fi. Additionally, you'll need to configure your network settings properly, including port forwarding if you're accessing your device from outside your local network. These initial steps ensure that your remote access setup is both functional and secure.
Essential Remote Access Methods
When it comes to remote access for Raspberry Pi, several methods stand out due to their reliability and ease of use. The most common approaches include SSH, VNC, and web-based interfaces. Each method serves different purposes and caters to various user preferences and project requirements.
SSH is the backbone of command-line remote access. It provides a secure channel over an unsecured network, allowing you to execute commands, transfer files, and manage your Raspberry Pi's operating system remotely. Most Linux distributions, including Raspberry Pi OS, come with SSH enabled by default, making it a convenient choice for many users.
VNC, on the other hand, offers a graphical desktop environment. This method is ideal for users who prefer a visual interface or need to run applications that require a graphical user interface. VNC works by transmitting the desktop environment from the Raspberry Pi to your remote device, allowing you to interact with it as if you were sitting in front of the physical machine.
Read also:Mia Khalifa Sax Exploring The Journey Beyond Controversy
Comparison of Remote Access Methods
- SSH:
- Best for: Command-line operations, scripting, and automation
- Advantages: Lightweight, secure, and widely supported
- Disadvantages: No graphical interface
- VNC:
- Best for: Graphical applications and desktop environments
- Advantages: Full desktop experience, user-friendly
- Disadvantages: Higher bandwidth requirements
- Web-based Interfaces:
- Best for: Cross-platform access and specific applications
- Advantages: Accessible from any device with a browser
- Disadvantages: Limited functionality compared to native solutions
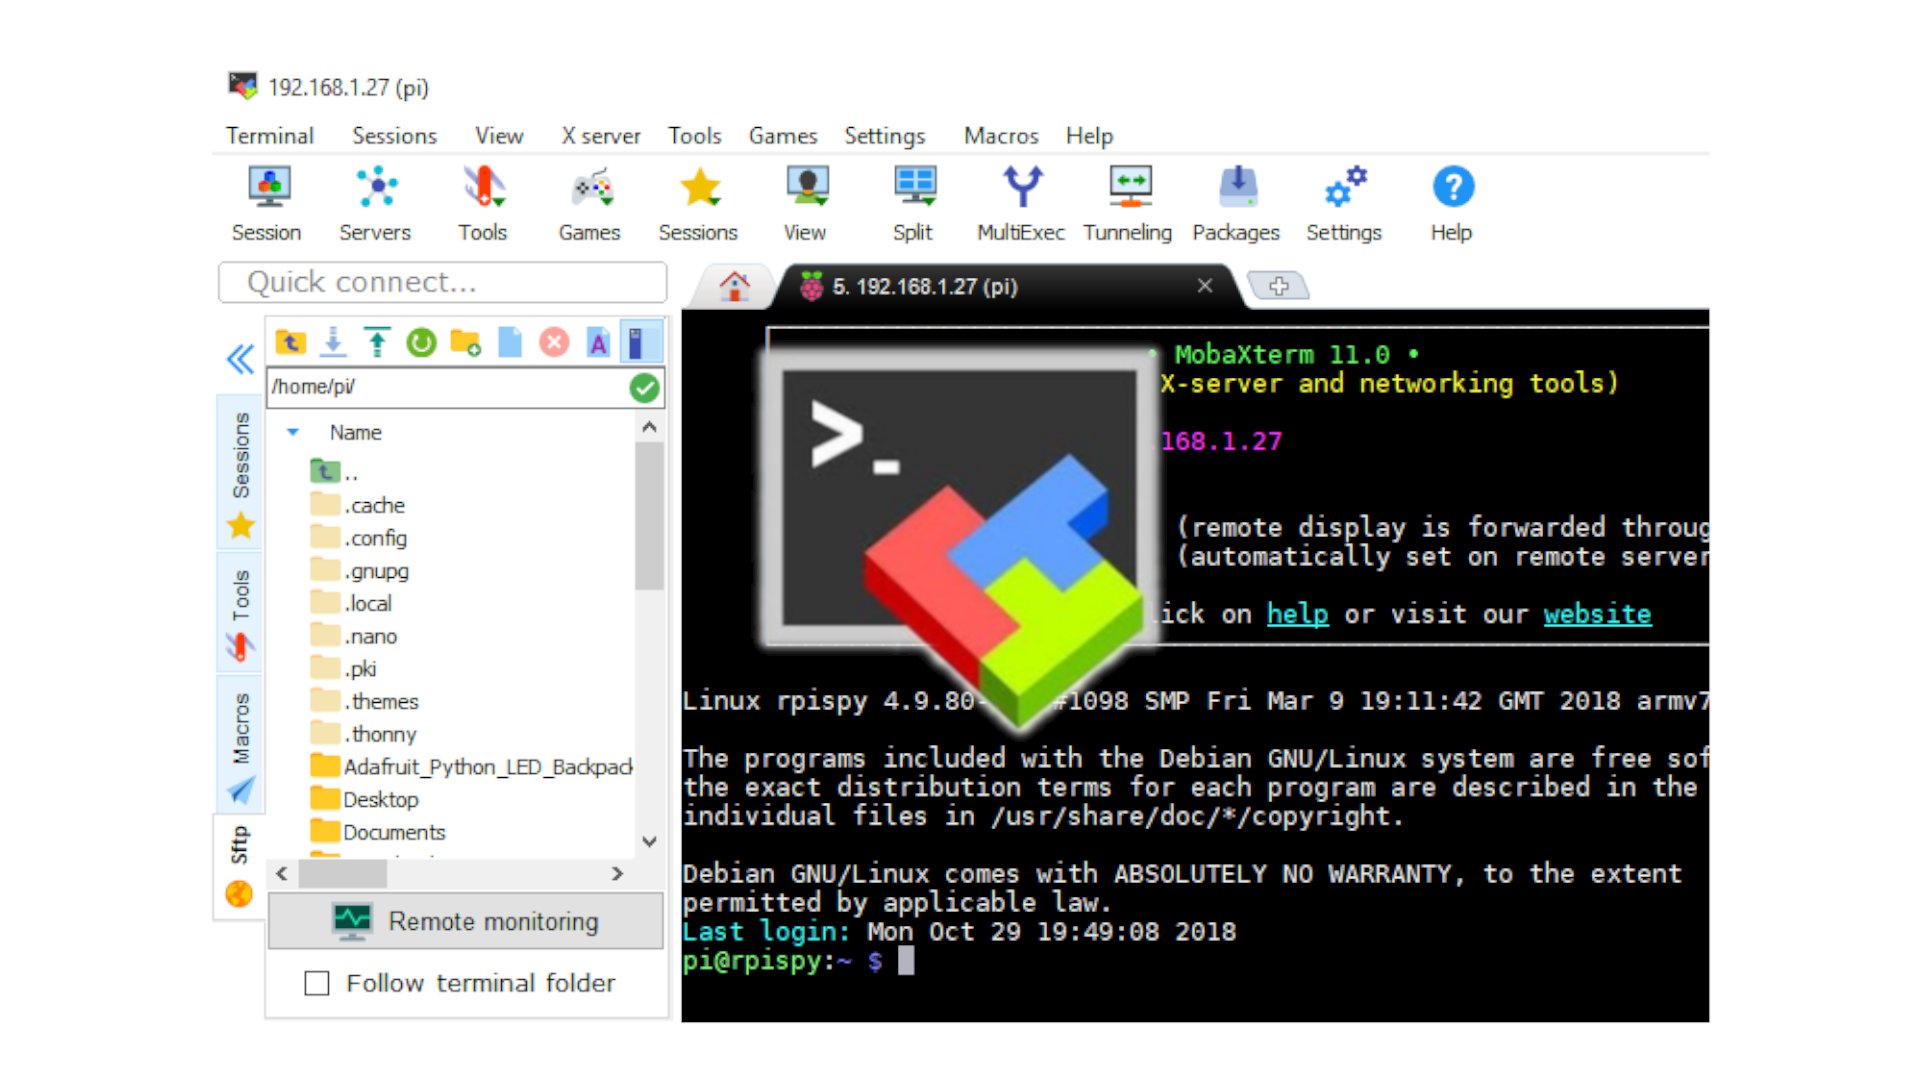
Setting Up SSH for Secure Access
Secure Shell (SSH) is one of the most fundamental tools for remote access for Raspberry Pi. Setting up SSH involves several steps, but the process is straightforward and essential for secure command-line access to your device.
To begin, you need to enable SSH on your Raspberry Pi. If you're using Raspberry Pi OS, you can do this through the Raspberry Pi Configuration tool. Navigate to Preferences > Raspberry Pi Configuration, then click on the Interfaces tab and enable SSH. Alternatively, you can create an empty file named "ssh" in the boot partition of your SD card to enable SSH automatically on first boot.
Once SSH is enabled, you can connect to your Raspberry Pi from any computer using an SSH client. On Windows, you can use PuTTY or the built-in Windows Terminal. For macOS and Linux users, the terminal application provides native SSH capabilities. The basic command to connect is:
ssh pi@your_raspberry_pi_ip_address
Replace "your_raspberry_pi_ip_address" with the actual IP address of your device. The default username is "pi" and the default password is "raspberry" (though you should change this immediately).
Advanced SSH Configuration
For enhanced security and functionality, consider implementing these advanced SSH configurations:
- Change the default SSH port from 22 to a custom port number
- Disable password authentication and use SSH keys instead
- Set up two-factor authentication for additional security
- Configure SSH tunneling for secure data transfer
Using VNC for Graphical Access
Virtual Network Computing (VNC) provides a powerful solution for remote access for Raspberry Pi when you need a graphical interface. This method allows you to view and control your Raspberry Pi's desktop environment from another device, making it ideal for projects that require visual interaction.
To set up VNC on your Raspberry Pi, you'll need to enable the VNC server. Similar to SSH, you can do this through the Raspberry Pi Configuration tool under the Interfaces tab. Once enabled, you can use the RealVNC Viewer application to connect to your device. The VNC Viewer is available for Windows, macOS, Linux, Android, and iOS, ensuring cross-platform compatibility.
When connecting via VNC, you'll need your Raspberry Pi's IP address and the VNC port number (default is 5900). The connection process typically involves opening the VNC Viewer application, entering the connection details, and authenticating with your Raspberry Pi's credentials. The result is a full desktop experience that mirrors your local setup.
Optimizing VNC Performance
To ensure smooth VNC performance, consider implementing these optimization techniques:
- Adjust the screen resolution to match your remote device's capabilities
- Use compression settings to reduce bandwidth usage
- Enable adaptive quality settings for better performance on slow connections
- Utilize direct connections when possible, avoiding NAT traversal
Web-Based Remote Access Solutions
Web-based remote access for Raspberry Pi offers unique advantages, particularly for projects that require cross-platform compatibility or specific application interfaces. This method allows you to access your Raspberry Pi through a web browser, eliminating the need for dedicated client software.
Several web-based solutions are available for Raspberry Pi remote access. Webmin, for example, provides a comprehensive web-based interface for system administration. It allows you to manage users, configure services, and monitor system performance through a browser. Another popular option is Cockpit, which offers a modern interface for server management and monitoring.
For more specialized applications, you can develop custom web interfaces using frameworks like Flask or Django. These solutions can be tailored to your specific project requirements, providing exactly the functionality you need. For instance, you could create a web-based dashboard for monitoring sensor data or controlling IoT devices connected to your Raspberry Pi.
Implementing Web-Based Access
To set up web-based remote access:
- Install the desired web interface software on your Raspberry Pi
- Configure the web server to listen on a specific port
- Set up proper authentication mechanisms
- Ensure HTTPS is enabled for secure connections
- Test the interface from different devices and browsers
Advanced Remote Access Techniques
As you become more comfortable with basic remote access methods, you can explore advanced techniques to enhance your Raspberry Pi's capabilities. These methods can improve security, increase functionality, and optimize performance for various use cases.
One powerful technique is setting up a reverse SSH tunnel. This approach allows you to access your Raspberry Pi from outside your local network without configuring port forwarding on your router. The reverse tunnel creates a persistent connection from your Raspberry Pi to an intermediate server, through which you can establish secure connections.
Another advanced method involves using Docker containers for remote access services. By containerizing your applications and access methods, you can achieve better isolation, easier deployment, and simplified maintenance. Docker also enables you to run multiple services on the same Raspberry Pi without conflicts.
Implementing ZeroTier for Virtual Networking
ZeroTier offers a modern approach to remote access by creating virtual networks that work across different physical locations. To set up ZeroTier:
- Install the ZeroTier client on your Raspberry Pi
- Create a network on the ZeroTier Central website
- Join your Raspberry Pi to the network using the network ID
- Authorize the device through the ZeroTier interface
- Access your Raspberry Pi using its ZeroTier IP address
Security Best Practices
When dealing with remote access for Raspberry Pi, security should be your top priority. Implementing proper security measures protects your device from unauthorized access and potential attacks, especially when exposing it to the internet.
Start by changing the default username and password immediately after setting up your Raspberry Pi. Use strong, complex passwords that combine letters, numbers, and special characters. Consider implementing two-factor authentication (2FA) for an additional layer of security.
Regularly update your Raspberry Pi's operating system and installed software to patch known vulnerabilities. Use the following commands to keep your system up-to-date:
sudo apt update && sudo apt upgrade -y
Implement firewall rules to restrict access to necessary ports only. Tools like UFW (Uncomplicated Firewall) make this process straightforward. Additionally, consider using fail2ban to automatically block IP addresses that show malicious behavior.
Advanced Security Measures
- Set up automatic security updates
- Use SSH key-based authentication instead of passwords
- Implement intrusion detection systems (IDS)
- Regularly review system logs for suspicious activity
- Encrypt sensitive data both at rest and in transit
Troubleshooting Common Issues
Even with careful setup, you may encounter issues with remote access for Raspberry Pi. Understanding common problems and their solutions can save you valuable time and frustration.
One frequent issue is connection timeouts or refused connections. This often stems from incorrect network configuration or firewall settings. Verify that your Raspberry Pi is connected to the network and that the necessary ports are open. Use tools like ping and netstat to diagnose network connectivity issues.
Performance problems with VNC connections can occur due to network congestion or insufficient resources on your Raspberry Pi. Monitor your device's CPU and memory usage using tools like htop or top